By
By
What is Astronomer Airflow?
We'll start here with Airflow. Apache Airflow is an open-source workflow management platform that helps you build Data Engineering Pipelines. One of the biggest advantages to Airflow, and why it is so popular, is that you write your configuration in Python in the form of what is referred to as a DAG (Directed Acyclic Graph). The power of writing a DAG with Python means that you can leverage the powerful suite of Python libraries available to do nearly anything you want.
Next up is Astronomer. Astronomer is a managed Airflow service that allows you to orchestrate workflows in a cloud environment. A common use case for Airflow is taking data from one source, transforming it over several steps, and loading it into a data warehouse. You can even leverage Airflow for Feature Engineering, where you apply data transformations in your Data Warehouse, creating new views of data. In this post, I'll walk through the basics of Airflow and how to get started with Astronomer.
Let's get started!
Install Homebrew
Homebrew will be the easiest way for you to install the Astronomer CLI. If you don't have Homebrew installed, you can install it by visiting the Homebrew website and running the command they provide.
Install Docker
Next, we need to install Docker. Docker is a container management system that allows you to run virtual environments on local computers and in the cloud. Docker is extremely lightweight and powerful. Airflow runs in docker containers and installs everything needed, such as a web server and a local database. Head to the Docker website and install Docker Desktop for your operating system.
Note: Commercial use of Docker Desktop in larger enterprises (more than 250 employees OR more than $10 million in annual revenue) and government entities requires a paid subscription.
Astronomer CLI
Finally, let's get Astronomer CLI (Command Line Interface) installed. The CLI is a command line tool that allows you to interact with the Astronomer service. You can use the CLI to create new projects, deploy code, and manage users.
brew install astro
Note: For this example, we're not going to publish any of our DAGs to the cloud; we'll run them locally to get a feeling for how Astronomer works.
Create a Python Virtual Environment
A Virtual Environment is a great way to isolate the packages you'll use to run Airflow, allowing you to have multiple Airflow projects with different dependencies. You can create a virtual environment by running the following command:
python3 -m venv venv
And then activate the environment if necessary. If you're using Visual Studio Code, you can use the command palette to activate the environment, or it should activate as you open the project.
source venv/bin/activate
Initialize a Project
Create a new folder for your project and launch your IDE of choice; my tool is Visual Studio Code. I called mine Astro in this example, but a more descriptive name for the job you're trying to run would be more appropriate.
Run the command astro dev init, creating a new project with a few files and folders. The most important file is the Dockerfile. This file is used to build the docker image you will use to run the Airflow instance. The Dockerfile is a text file that contains all the commands a user could call on the command line to assemble an image. Using docker build, users can create an automated build that executes several command-line instructions in succession.
You will also find a requirements.txt file in the folder that contains all the python packages you'll need to run your DAGs. You can add additional packages to this file as needed. As we get here, we'll not have any additional dependencies; the only one present will be apache-airflow.
The Anatomy of a DAG
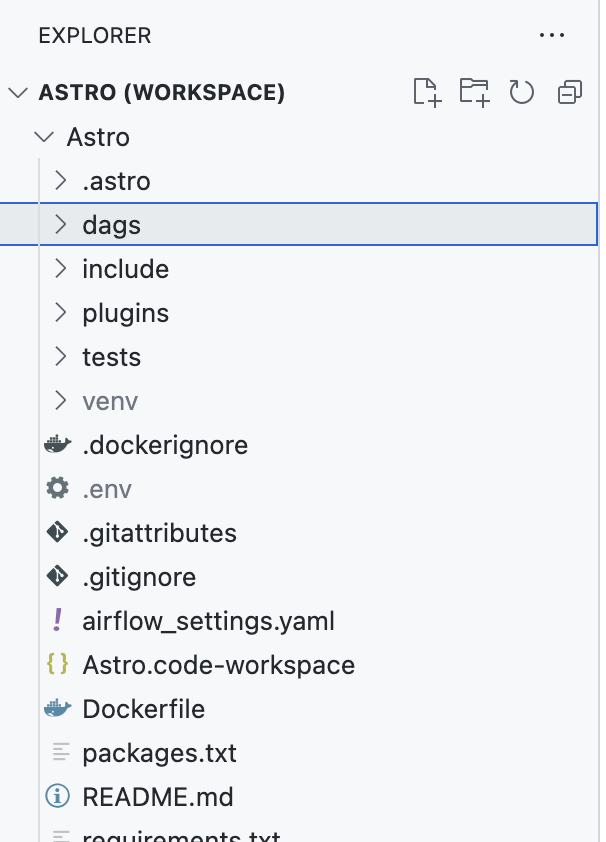
DAGs placed in the /dags directory will automatically appear in the Airflow UI. It's important that the .py file that contains the logic for the DAG has a DAG context manager definition; you can see the one below in the line with DAG('example_dag'. Newer versions of Airflow use decorators (@dag() to accomplish the same thing.
Let's look at an example DAG and discuss the various components.
from airflow import DAG
from airflow.operators.dummy_operator import DummyOperator
from airflow.operators.bash_operator import BashOperator
from airflow.operators.python_operator import PythonOperator
from airflow.version import version
from datetime import datetime, timedelta


def my_custom_function(ts,**kwargs):
    """
    This can be any python code you want and is called from the python
    operator. The code is not executed until the task is run by the
    airflow scheduler.
    """
    print(f"Task number: {kwargs['task_number']}.")
    print(f"DAG Run execution date: {ts}.")
    print(f"Current time: {datetime.now()}")
    print("Full DAG Run context.")
    print(kwargs)


# Default settings applied to all tasks
default_args = {
    'owner': 'airflow',
    'depends_on_past': False,
    'email_on_failure': False,
    'email_on_retry': False,
    'retries': 1,
    'retry_delay': timedelta(minutes=5)
}

# Using a DAG context manager, you don't have to
# specify the dag property of each task
with DAG('example_dag',
         start_date=datetime(2019, 1, 1),
         max_active_runs=3,
         schedule_interval=timedelta(minutes=30),
         default_args=default_args,
         # catchup=False
         ) as dag:

    t0 = DummyOperator(
        task_id='start'
    )

    t1 = DummyOperator(
        task_id='group_bash_tasks'
    )
    t2 = BashOperator(
        task_id='bash_print_date1',
        bash_command='sleep $[ ( $RANDOM % 30 )  + 1 ]s && date')
    t3 = BashOperator(
        task_id='bash_print_date2',
        bash_command='sleep $[ ( $RANDOM % 30 )  + 1 ]s && date')

    # generate tasks with a loop. task_id must be unique
    for task in range(5):
        tn = PythonOperator(
            task_id=f'python_print_date_{task}',
            python_callable=my_custom_function,
            op_kwargs={'task_number': task},
        )

        t0 >> tn # inside loop so each task is added downstream of t0

    t0 >> t1
    t1 >> [t2, t3] # lists can be used to specify multiple tasks
Building Blocks
- Imports: This is simply the list of python libraries you wish to utilize in your project. Use these like you would any python project.
- Custom Function: Custom functions sit outside the context manager and are called from the Python Operator. The function can be any python code you want and is called from the python operator. The code is executed once the airflow scheduler runs the task.
- Default Arguments: A dictionary of default settings applied to all tasks. These can be overridden at the task level.
- DAG Context Manager: More on that next!
- Tasks: Various steps in your workflow
- Execution Order: The order in which airflow runs each task
DAG Context Manager
The DAG Context Manager is where the logic resides for how the graph is built. Let's walk through the example DAG above and discuss the various components. There are other ways to build a DAG, including the new Taskflow API. However, the DAG Context Manager is a common method for building a DAG. The Context Manager allows for easy assignment of tasks to the DAG and the ability to add dependencies between tasks.
First off is the name of the dag (example_dag), which you'll see later in the Astro UI. Then some global settings, including the default_args that were defined before.
Tasks
Next is our first task, t0 = DummyOperator. The Dummy Operator does nothing but allows you to group tasks to set the order in the graph that will execute. Next, we have another dummy operator followed by the next task, t2 = BashOperator. The Bash Operator lets you execute a Bash Script.
Finally, we see the next set of tasks in a loop, tn = PythonOperator utilizing the Python Operator, which can execute Python code and even, as in this example, call a functionthat we defined at the beginning of the file.
The op_kwargs argument is used to pass in the task_number variable to the function. In the function above, the **kwargs variable is also passed in addition to the `ts' variable. This variable allows the function to access the full context of the DAG Run.
Our function prints the full context variables with print(kwargs). We can go to the logs to see what our kwargs.
Execution Order
Now, bringing it all home, we set the order that the tasks will execute. Three lines of code tell the DAG how to execute. First is t0 >> tn inside the loop. This placement tells the DAG that tn runs on each iteration of the loop, where we know from the above that five tasks are generated.
Next is t0 >> t1. Dummy Operators allow the next line, t1 >> [t2, t3], to execute parallel tasks. The logic here says we have one starting Dummy Operator, six tasks in the next step, and two parallel tasks in the last step.
Start the Project
Run astro dev start to start the project and the docker container.
[+] Running 4/4
 ⠿ Container astro_cf4ada-postgres-1   Started    0.7s
 ⠿ Container astro_cf4ada-scheduler-1  Started    1.5s
 ⠿ Container astro_cf4ada-triggerer-1  Started    1.5s
 ⠿ Container astro_cf4ada-webserver-1  Started     2.2s

Airflow is starting up! This might take a few minutes…
Open the Docker Dashboard to see the different containers running. Like the console output above, we can see the four containers running.
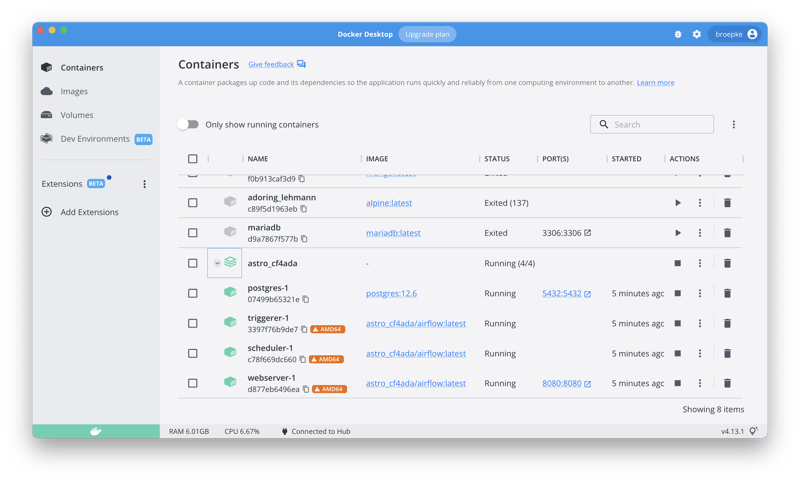
After it completes the startup process, you'll see the following in your shell. Note the URLs and credentials. Your browser should automatically launch to the Astro UI when it's ready, but you can always use the URL to access it later.
Airflow Webserver: http://localhost:8080
Postgres Database: localhost:5432/postgres
The default Airflow UI credentials are: admin:admin
The default Postgres DB credentials are: postgres:postgres
Open and Explore the Airflow UI
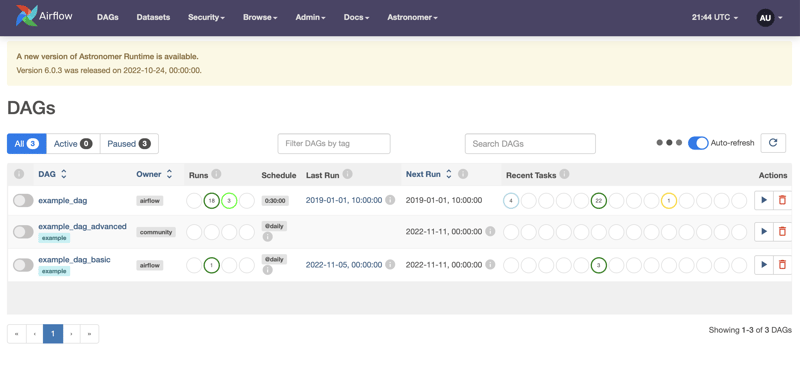
Take a look around the Airflow UI. The DAGs page will show you a list of all the available DAGs from your Astro Project. You can start your DAG with the slider control on the very left. After you do that, you will immediately start to see the DAG run!
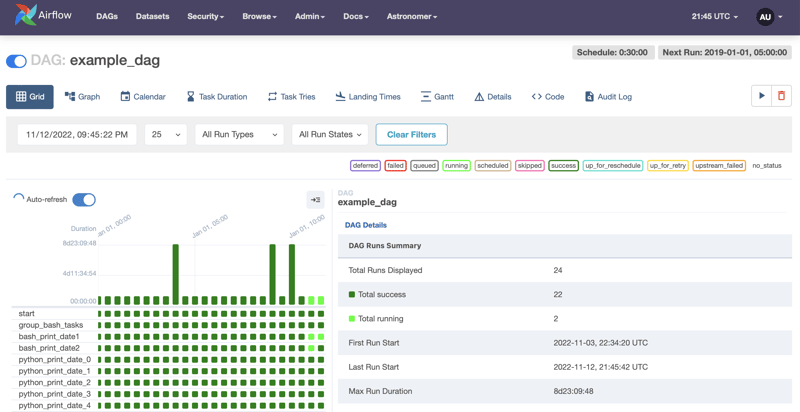
When you click on the name of the DAG, you are taken to the Grid View. The page shows a very cool color-coded map of the status of each of your task runs. You can click on each one to get more details, including the logs for that task. You can click on the failed task to see the logs if you have a failure.
Next up is the Graph View. The Graph View shows you the order your DAG is executed. Please look at the output from our Task Execution and map it back to the code we wrote above. You can see the order of execution and the dependencies between tasks.

Stop the Project
Finally, when you're done for the day developing, you can stop everything running with astro dev stop.
❯ astro dev stop
[+] Running 4/4
 ⠿ Container astro_cf4ada-triggerer-1  Stopped
 ⠿ Container astro_cf4ada-webserver-1  Stopped
 ⠿ Container astro_cf4ada-scheduler-1  Stopped
 ⠿ Container astro_cf4ada-postgres-1   Stopped
Conclusion
Astronomer is a commercial offering of the open-source Apache Airflow service. It provides a highly reliable, managed service that allows you to build powerful workflow orchestrations for Data Engineering and Data Science. We covered the basics of getting started today, from installation to creating a project, running a DAG, and stopping the project. We also covered the basics of the DAG Context Manager and how to build a DAG. From here, you can start experimenting with your own DAGs and workflows and modernizing your data engineering and data science workflows. Happy coding!
As always, the code for this article can be found on GitHub